Backtesting Smart Money Concepts: Order Blocks, FVGs and Liquidity
How to turn order blocks, fair value gaps, liquidity sweeps, BOS and CHoCH into precise, testable rules — and find out whether your SMC idea actually works.
Smart Money Concepts has a testing problem. The framework — order blocks, fair value gaps, liquidity, market structure — is taught almost entirely through annotated hindsight charts, and it is genuinely difficult to find out whether any given piece of it makes money, because the concepts live in the eye of whoever is drawing them. Ask three SMC traders to mark the order blocks on the same chart and you will get three different sets of rectangles.
That is not a reason to dismiss it. Large orders do leave structural footprints, and several SMC ideas are restatements of things older traders already respected — supply and demand, stop runs, failed breaks. The problem is narrower: a concept you cannot write down precisely is a concept you cannot test. And untested, every SMC concept works, because hindsight quietly discards the occasions it failed.
So the useful move is to pin each concept down to a mechanical definition, then run that definition over years of data — every occurrence, including all the ones that failed. The definitions below are the ones Raw Edge implements as drag-in structural conditions, so each is stated the way an engine actually detects it.
Market structure: BOS and CHoCH
Everything in SMC hangs off market structure, so the definition has to start here. A swing high is a bar whose high is the highest within a window of bars either side — and it only exists once the right-hand side of that window has closed. From confirmed swings you get the familiar ladder of higher highs and higher lows, or lower highs and lower lows.
A break of structure (BOS) is price breaking the most recent confirmed swing in the direction of the prevailing trend — continuation. A change of character (CHoCH) is price breaking the most recent swing against the trend — the earliest structural evidence of reversal. Two parameters turn this from a picture into a rule, and both change results materially. The swing lookback sets how significant a swing must be before it counts as structure (Raw Edge tracks two at once — a finer one for BOS, a broader one for the reversal structure a CHoCH must break). And close-through versus wick-through decides whether a spike through the level counts as a break; requiring the candle to close beyond the level filters a remarkable number of fake breaks, at the cost of later signals. An optional displacement requirement — the break must come from an unusually large-bodied move — filters drift-through breaks as well.
Order blocks
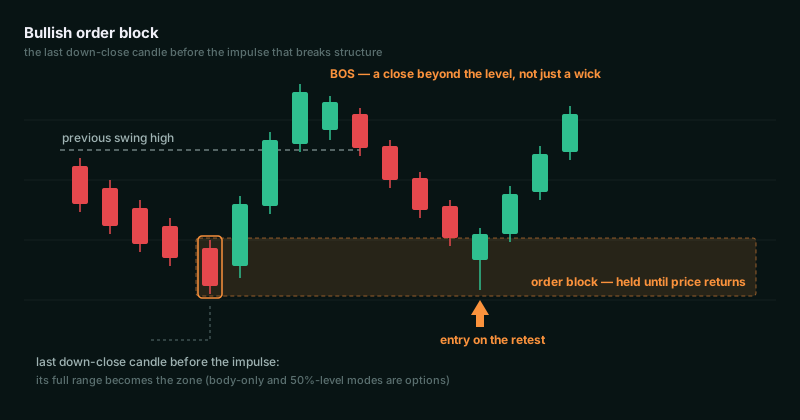
The narrative version says an order block is where institutions accumulated before moving the market. The mechanical version: the last opposite-direction candle before an impulsive move that breaks structure. For a bullish order block — the last down-close candle before the rally that broke a swing high. The candle's range becomes a zone, held on the chart until price returns to it or invalidates it.
The definition earns its keep in the refinements, each of which is a testable choice rather than a debate:
- Zone extent — the candle's full range, its body only, or its 50% level (the "mean threshold" entry ICT traders use).
- Minimum body — require the order-block candle to have a real body, so a doji does not qualify.
- Confluence filters — require the impulse to leave a fair value gap, require displacement, or require that the order block formed at a liquidity sweep (more below). Each filter cuts trade count and, if the concept is real, should improve trade quality — that trade-off is exactly what a backtest measures.
- Breaker blocks — an order block that failed, traded through, and is then used in the opposite direction on the retest.
Fair value gaps
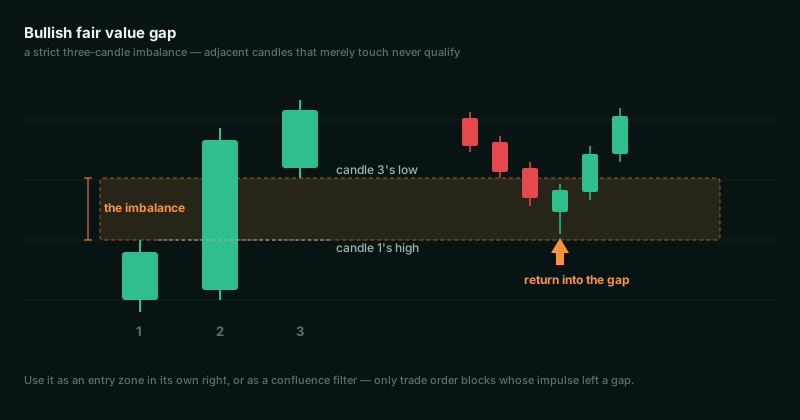
The cleanest definition in the whole framework, which is why it is a good place to start testing. A bullish fair value gap is a three-candle sequence where the third candle's low sits strictly above the first candle's high, leaving a price range the market skipped through without trading both sides. Bearish is the mirror. Candles that merely touch do not qualify, and a minimum gap size keeps microscopic imbalances out.
What makes an FVG testable as a zone rather than a pattern is lifecycle: once formed, the gap is tracked bar by bar until price comes back and fills it — mitigation — or it expires. That gives you two distinct, testable uses: enter on the return into a fresh gap, or use "the impulse left a gap" as a confluence filter on something else, such as only trading order blocks whose impulse was imbalanced.
Liquidity: pools, grabs and sweeps
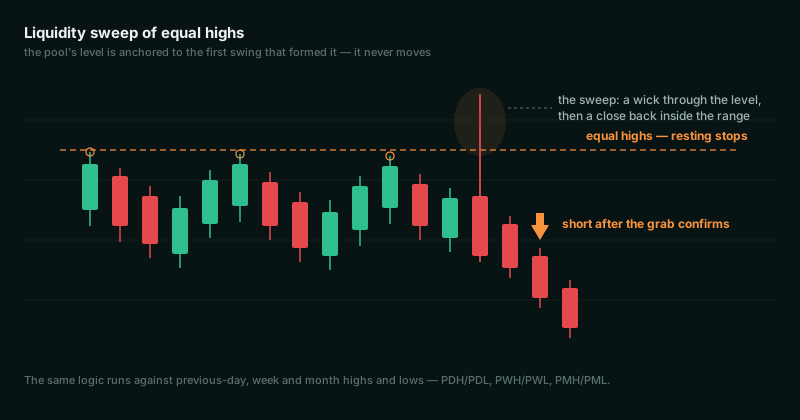
The ICT thesis is that price is drawn to where stop-losses rest, and that the sweep of those stops — the liquidity grab — marks the real move's starting point. Testable, once "where stops rest" is defined. Two definitions cover most of it. Equal highs or lows: clusters of confirmed swings within a tolerance of each other (measured in ATR so it scales across instruments), with a minimum number of touches; the pool's level is anchored to the first swing in the cluster, so it never drifts as new touches arrive. And previous-period extremes: the prior day's, week's or month's high and low — PDH/PDL, PWH/PWL, PMH/PML — each fixed the instant the new period opens.
A sweep is then price trading through the level but failing to hold beyond it — the wick takes the stops, the close comes back inside the range. That reclaim requirement is what separates a sweep from a breakout, and it is the difference between fading every break (expensive) and fading failed ones.
Premium, discount and the OTE
ICT entries are supposed to come from the right part of the range: buy in discount (the lower half of the current dealing range), sell in premium, with the optimal trade entry the 62–79% retracement band of the leg. Mechanically this needs a live definition of the dealing range — the span between the last confirmed opposing swings — recomputed as structure evolves. As a condition it acts as a location filter: the same order-block entry, allowed only in discount, is a directly testable comparison against the unfiltered version.
Killzones and sessions
Most ICT strategies are session strategies underneath — the London and New York killzones are where the setups are supposed to resolve. Session windows and the five ICT killzones are prebuilt filters in Raw Edge, but the honest order of operations is the reverse of the usual one: test without the filter first, look at where the profit actually came from in the session breakdown, and then restrict — rather than assuming the killzone matters because the course said so. Sometimes it does. Finding out is one click, not an argument.
Assembling a testable ICT strategy
A representative build, of the kind SMC traders describe discretionarily, expressed as a condition chain:
- Bias — daily-timeframe structure is bullish (most recent BOS/CHoCH direction), read from a higher-timeframe condition on an intraday chart
- Location — price is in the discount half of the current dealing range
- Trigger — a sweep of equal lows or the previous day's low, during the London killzone
- Entry — wait for the retrace into the fair value gap left by the displacement, using a structural entry with an expiry so a stale signal cancels rather than chasing
- Stop — structural, beyond the swept low with padding for spread
- Targets — partials at fixed risk-reward, or the opposing liquidity pool
Every line is a parameter, and that is the point. Each step becomes something you vary and measure instead of argue about: does the sweep requirement actually improve entries, or just reduce them? Does the killzone filter add anything once the sweep is required? Disable one condition at a time and the backtest tells you which components carry the edge — the usual discovery being that one or two do and the rest are decoration.
Two warnings from the general backtesting playbook apply with extra force here. SMC strategies have many knobs — lookbacks, tolerances, body percentages — which makes them unusually easy to curve-fit; prefer parameter plateaus over spikes, and hold out data, exactly as covered in the seven backtesting mistakes. And killzone strategies concentrate their trading in news-adjacent hours, so honest per-bar spread modelling moves results more than it does for most styles.
The part that makes any of this meaningful
None of the above is worth much if the detection cheats. Hand-drawn structure repaints by nature — the swing labels are applied after the swings are confirmed — and plenty of SMC indicators inherit the same flaw, marking order blocks and structure breaks at bars where they were not yet knowable. Everything described in this post fires on the bar where it became knowable, at candle close, and never moves afterwards; how that is enforced and tested is its own subject, covered in repainting indicators.
In Raw Edge, each concept above is a structural condition you drag into a Long or Short chain — every parameter explains itself on hover, and whatever a condition detects is drawn on your chart, so you can check every zone the rule found against the ones you would have drawn. From there the same rules backtest on your broker's own prices, run through the optimiser, and deploy unchanged to MetaTrader 5. SMC gives you a language for reading a chart. A backtest is how you find out which sentences in that language are true.
Test it before you trade it
Raw Edge lets you build strategies visually, backtest them with realistic spread and commission, and deploy the same logic straight to MetaTrader 5.
See pricingMore reading
- Repainting Indicators: Why Your Strategy Tests Well and Trades BadlyWhat repainting is, why so many indicators quietly rewrite their own history, how to test any tool for it — and how Raw Edge is built so signals stay put.
- MT5 Backtesting Software: How to Test a Strategy ProperlyA practical guide to backtesting software for MetaTrader 5 — data quality, spread and commission modelling, sample size, and out-of-sample testing.
- How to Backtest an EA Without Writing Any CodeYou do not need MQL5 to test a trading idea. Here is how no-code backtesting works, what it handles well, and where writing code is still the better option.